

If you’re going to spend every night on a bed for the rest of your life, it should be something you can take pride in – something you built with your own two hands.
Store-bought furniture is either expensive, low quality, or both. Only hardwood furniture can be expected to last more than a year or two, especially if it sees as much daily use as a bed. But a decent hardwood bed can easily cost over a thousand bucks!
So I built my own DIY hardwood bed frame for a fraction of the cost. After we published our Tuft & Needle mattress review, we received numerous requests for the frame design.
At the time, I hadn’t thought of documenting the process, and I built it sort of on the fly, so it took me a while to compile all the necessary steps into a comprehensive tutorial. But here it is at last!
DIY Hardwood Bed Frame
The good news is anybody can make this DIY hardwood bed frame! It is designed to be made without the use of special woodworking tools (other than a pocket hole jig, which I’ll discuss later on) or advanced skills. As long as you can cut in a straight line and use a tape measure and drill, you can make this bed!
I also designed it to be made with common board dimensions, so you won’t have to place any custom lumber orders. Everything you need should be easy to find at your local hardware store or lumberyard.
Wood
There are several kinds of hardwoods you can use, including oak, maple, poplar, birch, and teak. Oak is a fine choice because it’s good-looking and extremely durable without being crazy expensive. The attractive grain from oak never goes out of style, and it looks great whether stained or in its natural color.
Big-box warehouses don’t always carry a lot of hardwood, so you might have to scout your local lumberyard to get it.
If your lumberyard or hardware store is really nice, they might be willing to cut the wood into pieces for you. Otherwise you can cut them yourself with a circular saw or table saw. Practice cutting on some scrap first to get used to making straight cuts exactly on a measured line.
Whichever wood you choose, here are the pieces you’ll need for a queen size bed frame:
Hardwood (oak, etc.)
Bed frame:
- 1×4, 61-1/2 inches (x1) (A)
- 1×4, 16 inches (x2) (B)
- 1×8, 60 inches (x1) (C)
- 1×4, 32 inches (x2) (D)
- 1×6, 60 inches (x1) (E)
- 1×6, 80 inches (x2) (F)
Headboard:
- 1×4, 60 inches (x4) (G)
- 1×8, 18 inches (x8) (H)
- 1×6, 63 inches (x1) (I)
Softwood (pine)
Use softwood for the interior bracing. Since it won’t be visible, it doesn’t need to be pretty. Plain old pine studs (typically used for house framing) are plenty strong and dirt cheap. Still try to pick boards that are as straight as possible.
- 2×4, 82 inches (x2) (J)
- 2×4, 53 inches (x2) (K)
- 2×4, 75 inches (x1) (L)
- 2×4, 9-1/2 inches (x1) (optional) (M)
- 1×4, 60 inches (x6) (N)
A note on lumber dimensions: nominal and actual dimensions differ by anywhere from 1/4 to 3/4 inches.
Here’s a table if that’s confusing:
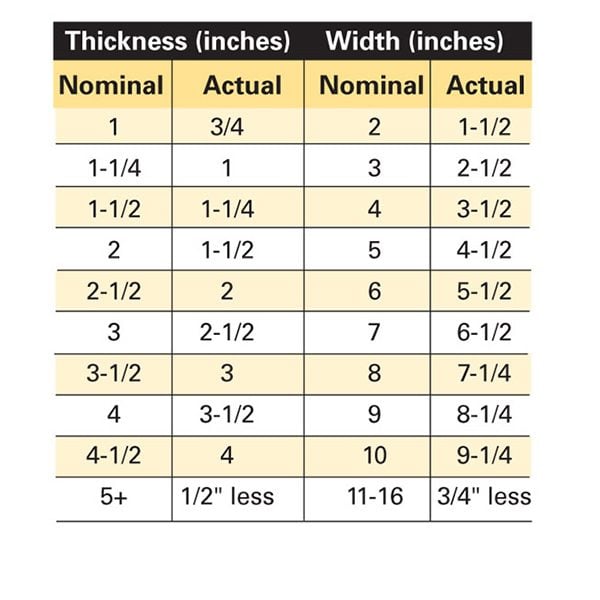
For example, 2×4 lumber is actually going to be 1-1/2 inches thick and 3-1/2 inches wide, while 1×8 lumber will be 3/4 inches thick and 7-1/4 inches wide.
The measurements in this tutorial already factor in actual dimensions, but it’s good to keep in mind as you build.
Other materials
- 1-1/4 inch pocket screws
- 2 inch wood screws
- Sandpaper (various grits)
- Wood stain (I used Rust-Oleum Ultimate Wood Stain)
- Polyurethane finish (I used Rust-Oleum Ultimate Polyurethane)
- Clean rags
- Foam brush
Tools
- Tape measure
- Clamps (I recommend “quick-grip” bar clamps like these)
- Right-angle clamp (optional)
- Saw (circular or table saw)
- Power drill
- Electric sander (optional)
- Pocket hole jig (also known as a Kreg jig)
Drill the pocket holes
The one tool you’ll need that you might not already own is a pocket hole jig, also known called a Kreg jig. You can get a cheaper, smaller Kreg tool, or a larger, more robust jig. Either will work, and pocket holes will prove infinitely useful for DIY projects in the future, so whichever you choose it’ll be a worthwhile investment.
The jig is very easy to use, and you can find tutorials all over the internet. Just clamp the jig against the side of the wood to be joined, then use the included pocket hole bit to drill a diagonal pocket hole. You’ll get a perfect pocket hole every time! You can then use pocket screws to join the pieces together easily.
Use the pocket hole jig to put pocket holes into the following pieces:
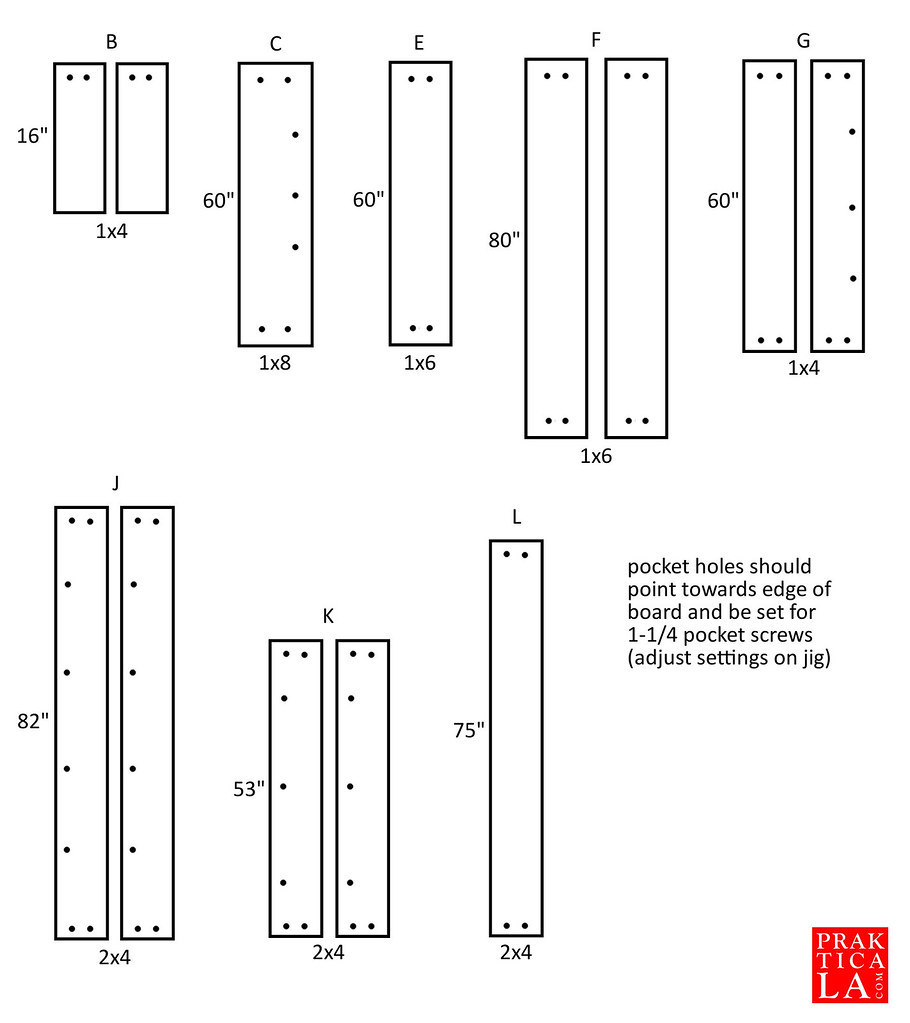
The great thing about pocket holes is that since they are hidden, they don’t have to be perfectly spaced apart. Just eyeballing it will do! Be sure to adjust the jig to accommodate the correct size pocket screws (in this case, 1-1/4 inches).
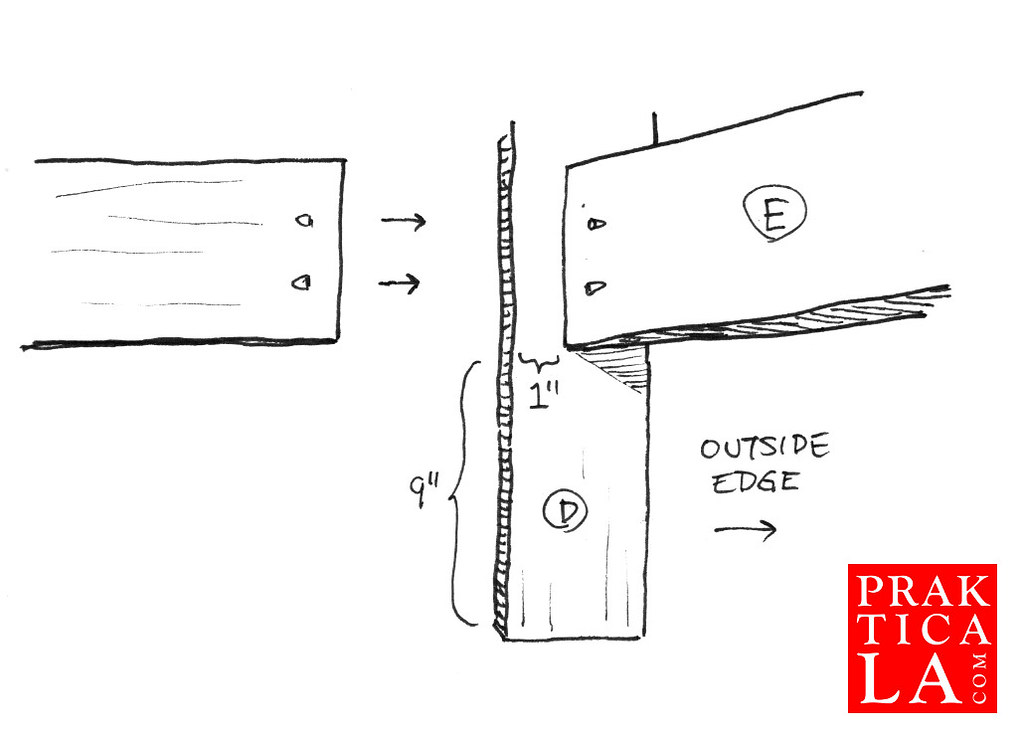
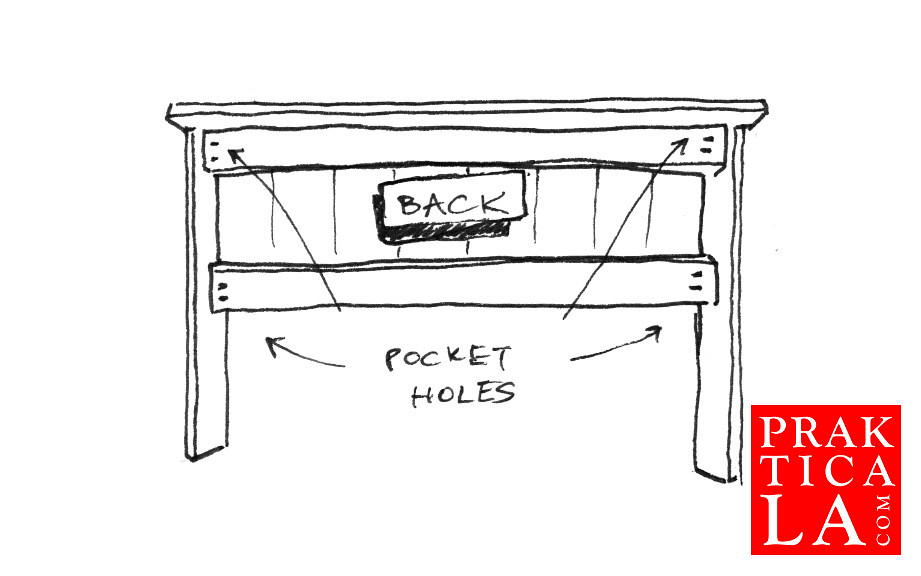
Assemble the frame
Here is the hardwood frame assembly:

First, attach the top panel (A) to the shorter legs (B) by drilling pocket screws through the pocket holes with the special square bit that comes with the jig. Make sure the pocket holes are on the interior (hidden) side of the legs. You should now have a big rectangular “U” shape.
(A right-angle clamp makes lining up the pieces easier, but if you don’t have one you can just line them up by hand before drilling in the screws.)
Also, for a really solid frame, apply a layer of wood glue to all your contact surfaces before joining them together with the screws. (This will make the assembly permanent, meaning you will not be able to take it apart later on.)
Next, take the “U” leg assembly and clamp the top panel (A) to the foot panel (C). The pocket holes in the foot panel should point upwards and be on the interior face of the board. Drill in the pocket screws from below, leaving a 1-inch space between the inside edge of the legs and the foot panel. Drill in the end pocket screws last.

For the longer legs (D), attach the head panel (E) 9 inches from the bottom of the legs (this will be the distance from the floor to the bed), leaving a 1-inch space between the inside edge of the legs and the panel.
Now screw the side panels (F) to the legs, 9 inches from the bottom, using clamps to keep the pieces aligned.
Assemble the headboard
If you were lucky enough to get 1×8 boards that are exactly 7-1/2 inches wide, then good news – eight panels side by side will be exactly 60 inches long.
However, your 1×8 boards might be 7-1/4 inches in actual width. In that case, you’ll have 2 inches of extra space to cover.
You could space them out evenly, leaving about a 1/5 inch gap between each panel. You could also leave a 1-inch gap on each end and eliminate all the spaces between panels. Or you can do a combination of the two – leave a 3/4-inch gap on both sides, so you’ll only have to cover just over 1/10 inch between each panel.
Or (this is what I did), you can use seven 1×8 panels (H) and then use two 1×5 panels on each side, which would leave you only 1/4 inch of slack! Of course, you’d have to find 1×5 boards (or cut them yourself), which might not be worth the hassle.
Whichever you choose, arrange the headboard assembly like so:
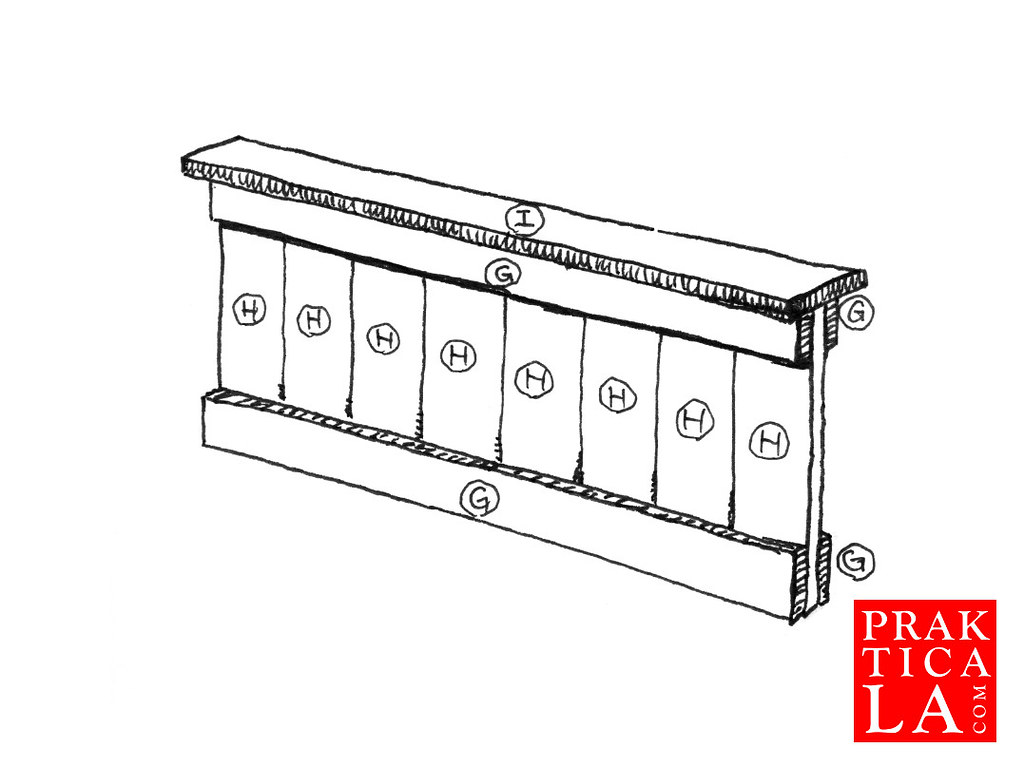
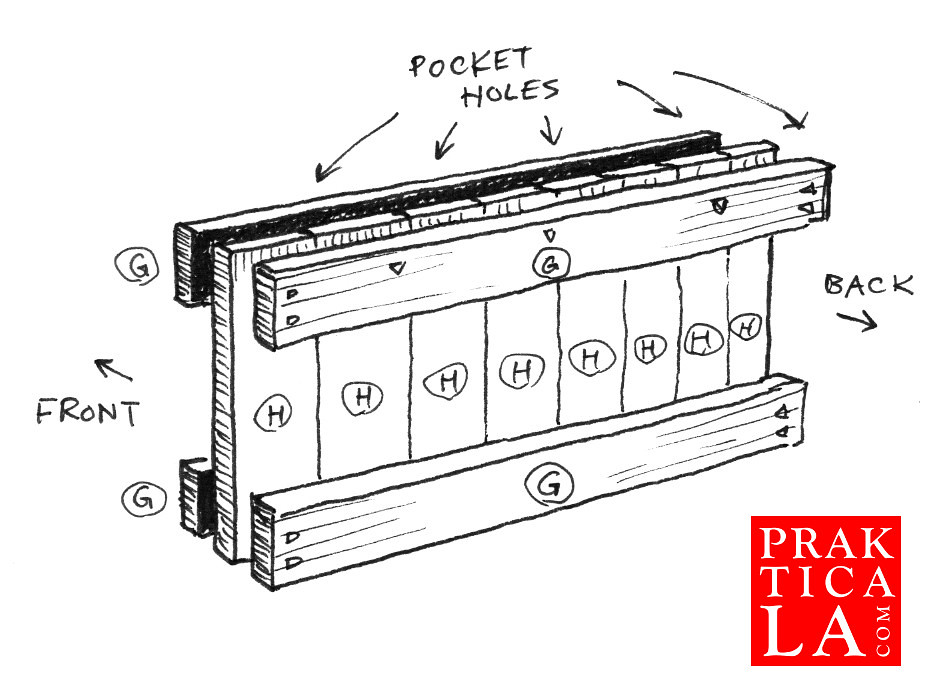
Sandwich your headboard panels (H) between the four 1×4 boards (G), two on top and two on bottom. The pocket holes should be on back of the headboard, with the vertically-oriented holes on top and pointing upwards.
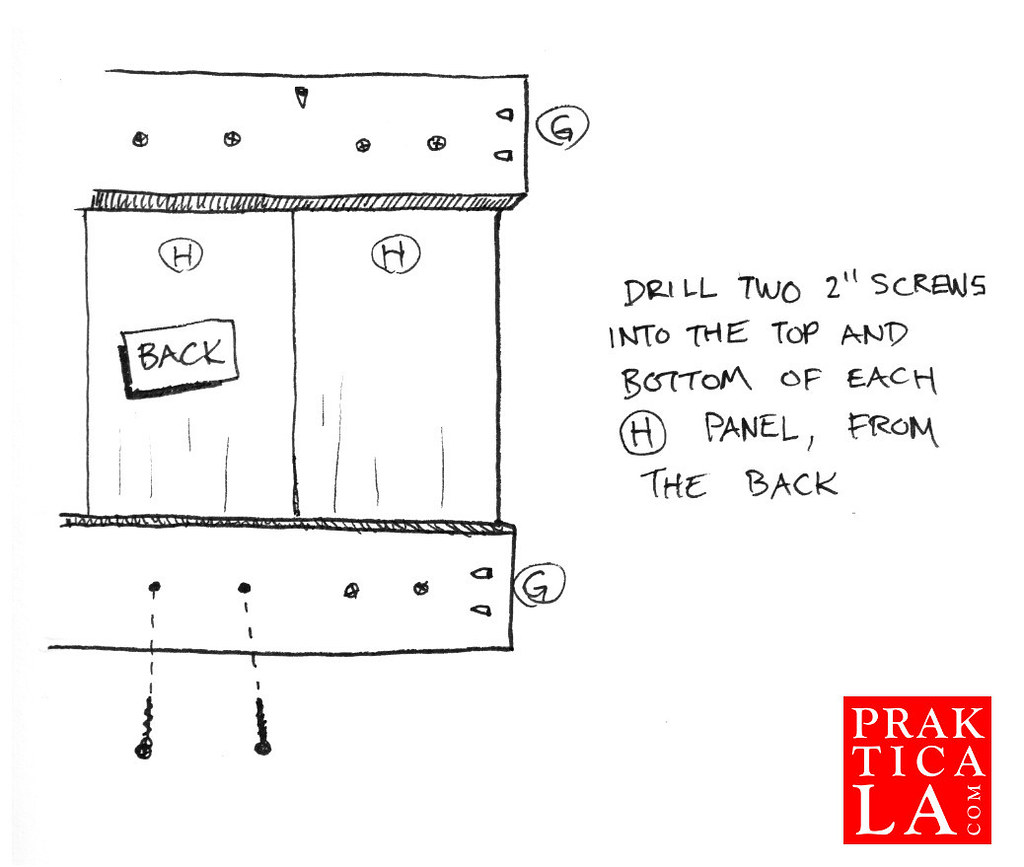
Apply wood glue to the contact surfaces, line everything up nice and square, clamp it all together, then from the back drill four 2-inch screws through each panel, two at the top and two at the bottom, through all three layers. Remember, these screws won’t be visible (assuming the headboard goes up against a wall). It might be helpful to drill pilot holes first with a 1/8-inch bit – just make sure you don’t drill through more than 2 inches.
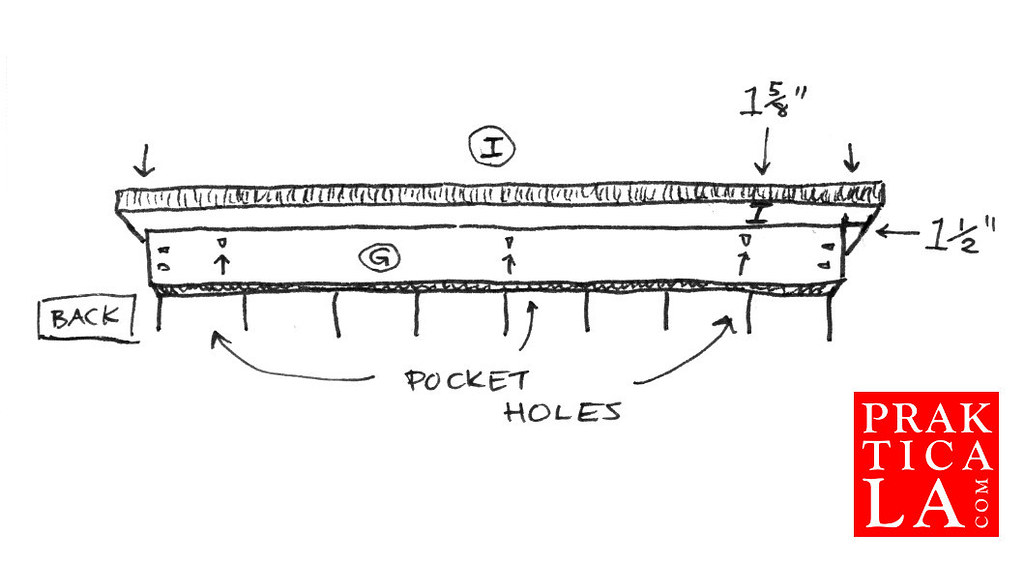
Take the top panel (I) and place it on top, with 1-1/2 inches of space hanging off the two ends and 1-5/8 inches off the front and back edges. It doesn’t have to be exact – as long as everything looks centered.
Finally, use pocket screws from underneath to attach the top panel (I) to the headboard assembly (G).
Sanding
If you have an electric sander, now would be the time to bust it out. If you don’t own one, you can always sand by hand.
Start with a medium grit, like 60, to remove any big bumps or uneven seams from the frame. Sand only along the grain of the wood! Otherwise you’ll create deep gouges that will ruin the smooth finish of the wood.
Move up to a finer grit, like 120 or 150, and give the entire assembly a good sanding. If you’re happy with how smooth it is you can stop here! (I did.) If you want it smoother, move up again to an even finer grit, like 240, then sand again.
Continue moving up in grit until you are happy with the surface. Repeat the same process for the headboard. Don’t forget to sand the sawn edges as well! Remember to sand along with the grain!
Staining and finishing
Wipe everything down with a damp rag to remove the sawdust and allow to dry. Then apply your favorite wood stain according to the manufacturer’s instructions. I used Rust-Oleum Ultimate Wood Stain in black cherry, although there are several other good-looking colors available.
Apply the stain with a clean rag, leave it on for a couple of minutes, then wipe it off for a nice rich color. Allow the stain to cure according to the manufacturer’s specified time (Rust-Oleum recommends at least 1 hour). You can also skip the stain if you want to keep the wood’s natural appearance.
Next, apply the polyurethane finish. I used Rust-Oleum Ultimate Polyurethane in satin for protection that wasn’t too shiny, preserving the natural beauty of the wood.
Use a foam brush to reduce bubbles and streak marks. Three coats should be plenty – just remember to allow enough time (about 2 hours) between coats for the polyurethane to cure.
Internal bracing
Your mattress will be rest on top of the bracing. The bracing will also keep your frame square and steady. Here is the assembly:
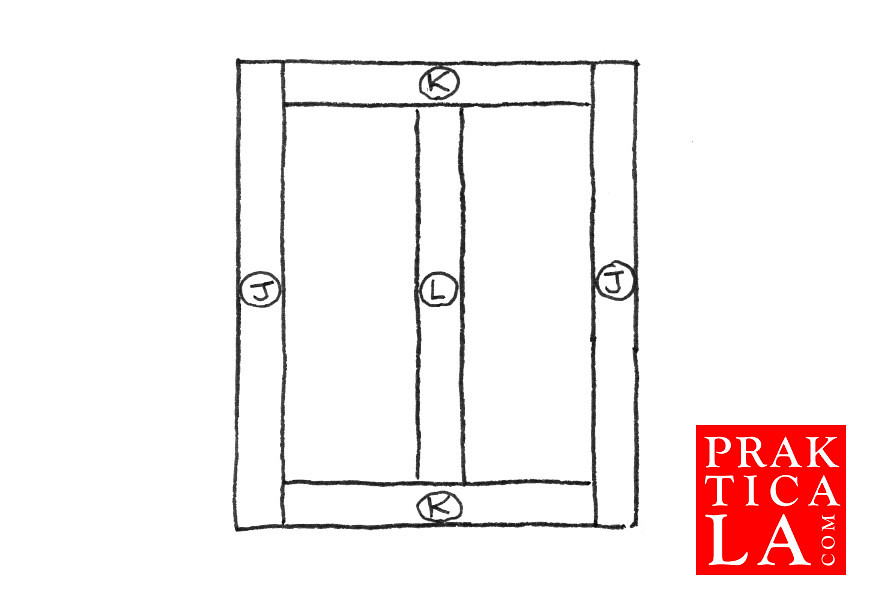
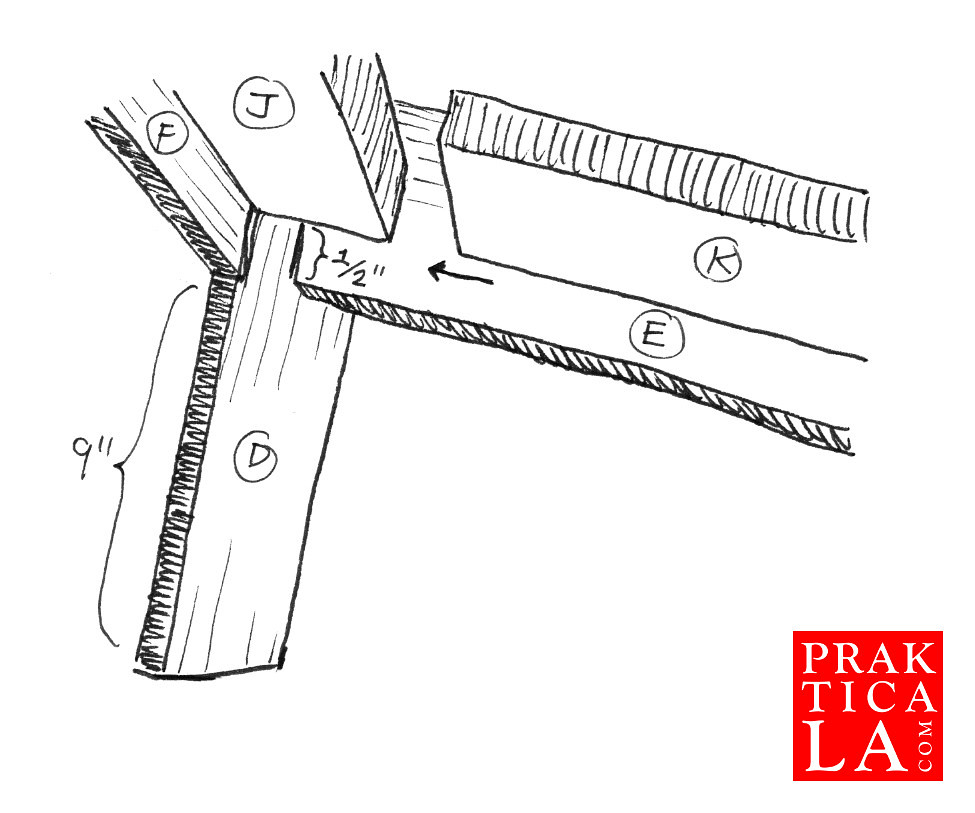
Clamp the pine studs to the inside of the frame, starting with the side studs (J), leaving a 1/2-inch space between the stud and the bottom of the side panels (F). Drill in the pocket screws along the long edge, then repeat for the head and foot studs (K).
After all four studs have been attached, put in the pocket screws on the ends. This will strengthen the entire assembly by locking every piece of wood to at least two others.

Next, clamp the center stud (L) in the middle (doesn’t have to be exact, since this is all going to be invisible) and put pocket screws into the head and foot studs (K).
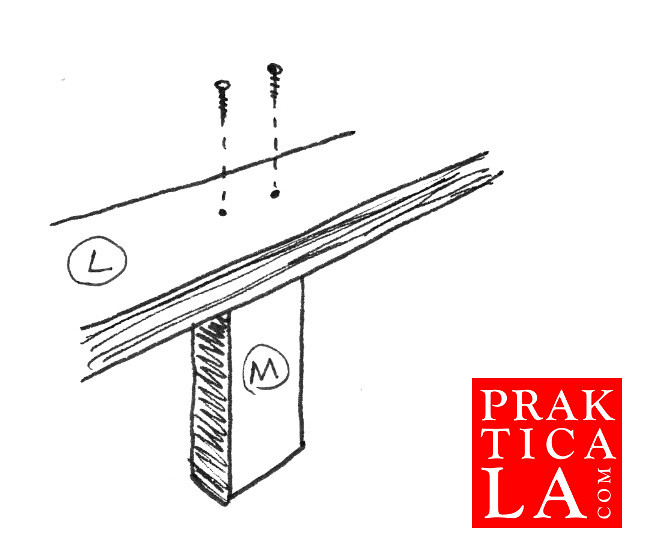
Optional: If you have any scrap pine left over, cut a piece (M) 9-1/2 inches long (the distance from the bracing to the floor). Put this piece underneath the center stud, somewhere in the middle, then screw in from above with a couple of 2-inch screws. This will serve as a fifth “leg” of the bed. While not completely necessary (unless you are building a king bed), it provides extra stability and may prevent sagging, especially if you and/or your partner are heavy or if there will be kids jumping on the bed.
Final assembly
For the final steps, it’s best to move the frame and headboard assemblies to the bedroom. The headboard is heavy and would make the bed much harder to move if it were assembled beforehand.
Set the frame down near where it will eventually end up. Leave a couple of feet of space from the wall for now so you have some clearance to put in the final pocket screws.
Lift the headboard and drop it straight down between the two “posts” formed by the taller legs (D). Make sure the all the pocket holes and screws in the headboard face the back of the bed. If you measured everything right, it should drop straight in.
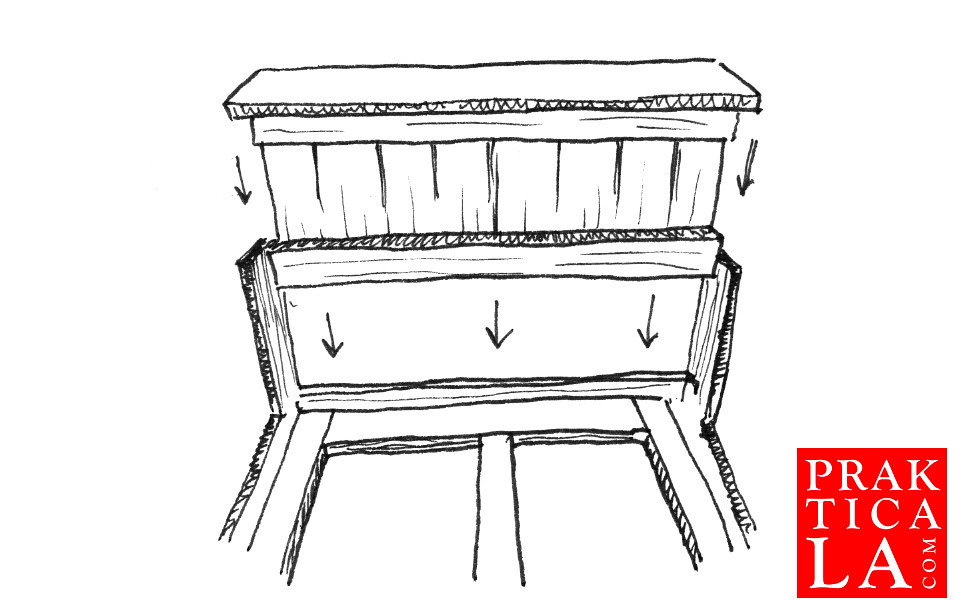
Center the headboard over the two posts, then put your final pocket screws into the back. Do not use wood glue for this step – the frame is already stable as it is, and if you ever move the bed, you will want to take the headboard off to reduce the weight.
Now you can put the bed against the wall!
Lastly, take your 1×4 pine slats (N), space them out evenly across the bracing, and attach them with three screws each – one into each stud (J, L, J). Throw some big pieces of cardboard (like flattened boxes) over the slats to keep your mattress from poking through the gaps.
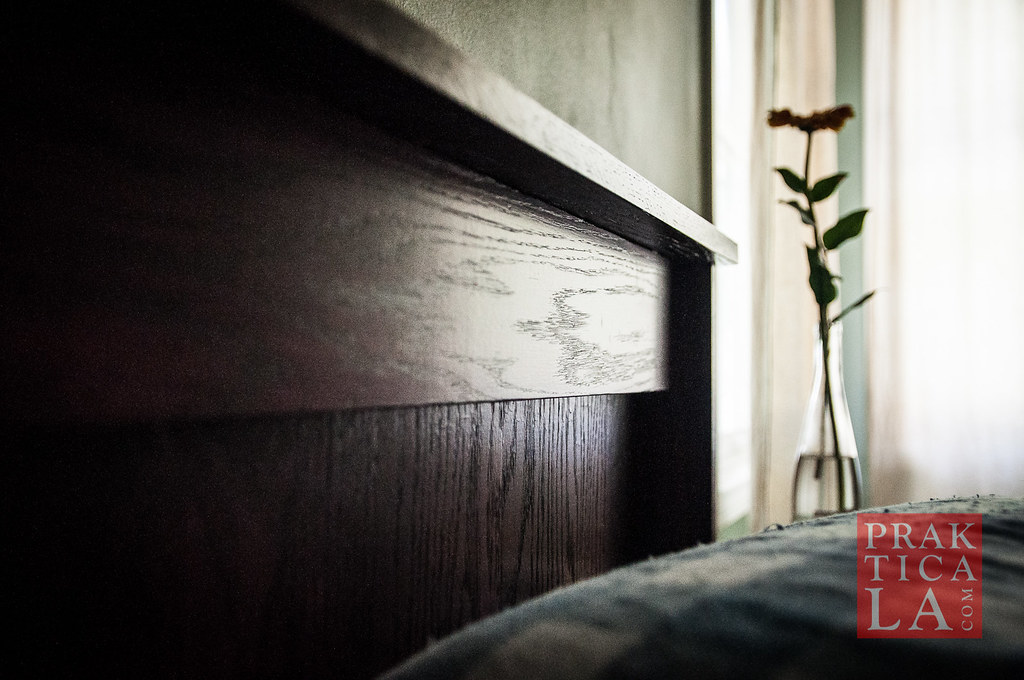
You’re done!!!
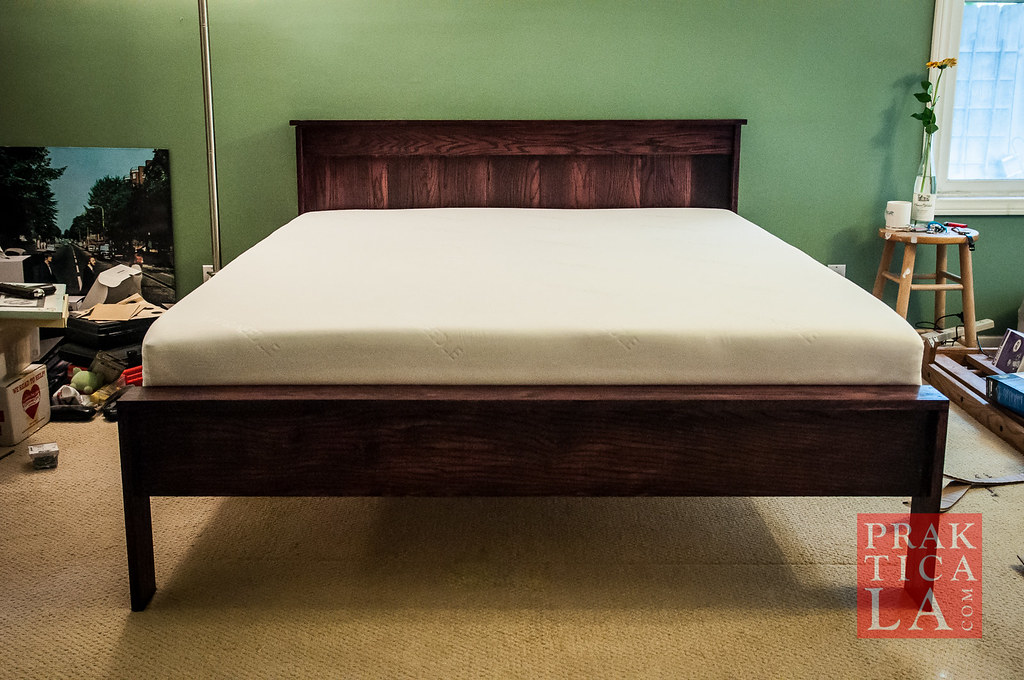
Sleep
Now to reap your rewards. Go ahead and drop your queen mattress into the frame. It should be a perfect fit!
If you’re in the market for a new mattress, check out our Tuft & Needle and Amerisleep mattress reviews for a couple of recommendations. Both are affordable, high-tech foam mattresses that will blow your old grungy springs out of the water. Plus, the link from my Amerisleep review will get you $50 off your order!
Modifications
I won’t get into mod specifics here, but if you want a size other than queen, you can extend or shorten the dimensions according to this chart:

Thus, to modify the instructions for a cal king, simply add 12 inches to all the boards that run width-wise and add 4 inches to all the boards running length-wise.
You may also make similar adjustments to how high off the ground the bed will be by adding inches to all four legs (including the optional fifth center leg) and then adding that same number to the distance from the ground.
To extend the length of the headboard, simply add the same number of inches to the two longer legs and the headboard panels. Keep in mind that either of these mods may make it harder to get the frame through a doorway. I actually designed and built the bed to be taller, then had to cut it down shorter when I couldn’t maneuver it into my bedroom!
Conclusion
It’s a lot of work, but the feeling of sleeping in a bed that you built is highly rewarding. Good hardwood, combined with the strength of pocket hole joinery, will make heirloom quality furniture that should last for your lifetime. Yoselin from 6 Mono Media and I have done plenty of jumping on our bed and so far it is still solid as a rock!

Remember to check out my Tuft & Needle and Amerisleep mattress reviews (and use this link to get $50 off your Amerisleep order).
Questions or comments? Drop us a line below. We’d also love to see your creations as well!
